This page sets the benchmark.
Many casting houses gate-keep this kind of information and only drip-feed it after something goes wrong. Not us! We show you exactly what’s required upfront because when CAD files are done properly from the start, everyone wins: faster turnaround, fewer delays, zero surprises.
Precious metal casting is high-output, high-stakes work, we cast hundreds, sometimes thousands, of pieces every week. As specialists in precious metal casting, we know exactly what it takes to get your designs from CAD to print to metal without porosity, warping, shrinkage, or failure. And that only happens when the CAD is done right.
Whether you're a solo jeweller producing custom one-offs or a production house pushing serious volume, we cast with the kind of precision, quality and consistency others only talk about. Every piece we cast starts with one thing: a technically correct CAD file. If the CAD isn’t right, nothing downstream will be. No amount of finishing, patching, or post-production can compensate for poor CAD files.
What follows isn’t theory. It’s a practical, battle-tested guide forged from years of real-world production from thousands of successful castings and just as many preventable failures. It outlines exactly what we need from you if you need flawless quality and precision.
If you need reliability, precision, and repeatable quality, you’re in the right place.
We do not accept poorly meshed STL files. Mesh quality directly impacts both print accuracy and casting results. It is the CAD designer’s responsibility to provide clean, properly meshed files.
Due to the fragility of 3D printed wax (which melts at just 50°C), we do not attach sprues manually.
Straight sprues are acceptable in some cases such as pendants or bangles, but for rings, we strongly recommend Y-shape sprues. Ring castings are far less forgiving, and the margin for error in precious metal casting is incredibly slim.
We’ve seen too many miscasts and shrinkage porosity issues caused by thin, straight sprues, often chosen to save on metal. These shortcuts come at the cost of reliability and finish, which isn’t compatible with the calibre of quality our clients demand.
The Y-shape sprue offers key advantages:
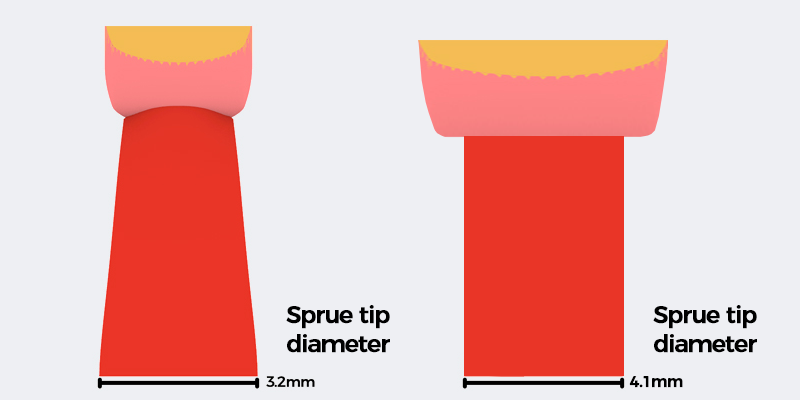
In the first image, you’ll see a front view of the Y-shape sprue. The two images below show the side view. Note how the red sprue pinches inward, this preserves the shape of the shank, while the Y-branch compensates to maintain the faster flow characteristics despite the restriction.
Sprue tip diameters:
Short-cuts and cost saving measures don’t pay off, deviating from the recommended sprue size or shape, even slightly can cause costly failures, delays and unhappy clients.
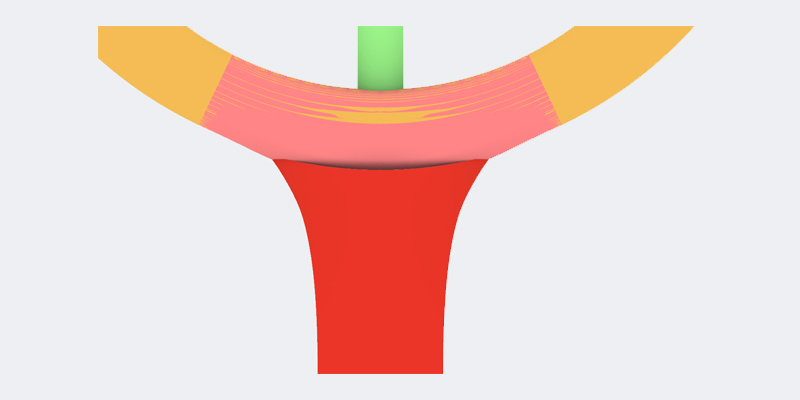
Important: Adding a one size fits all sprue is not the right way of doing things (it's a short-cut some CAD designers try get away with). CAD designers must model “extra meat” at the sprue join (e.g. base of shank). This gives jewellers enough material to de-sprue and finish the piece without flattening or warping the shape.
In the below image 2 images, we understand CAD designers may look at our sprue design first and say “it wont print” (in this instance they are correct). You can see in the below images, there is a empty space between the sprue and the ring. Naturally, many CAD designers have been “pushing” the sprue into the profile of the ring. After your jeweller cuts and files the sprue, you may have a not perfectly round shank at the base. Please note: the gaps represented below are over-emphasised for web display purposes, in the real world it's usually around 0.20mm "extra meat" where the sprue connects to the shank.
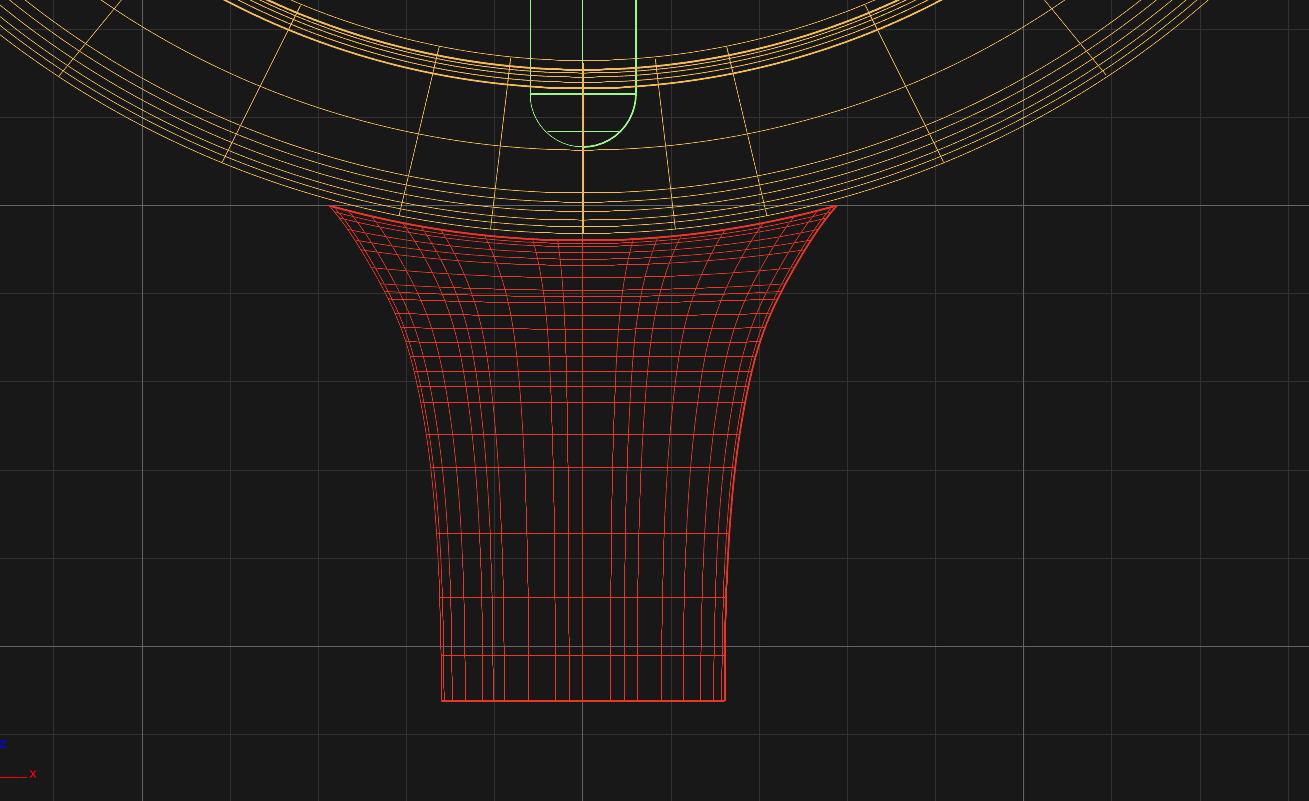
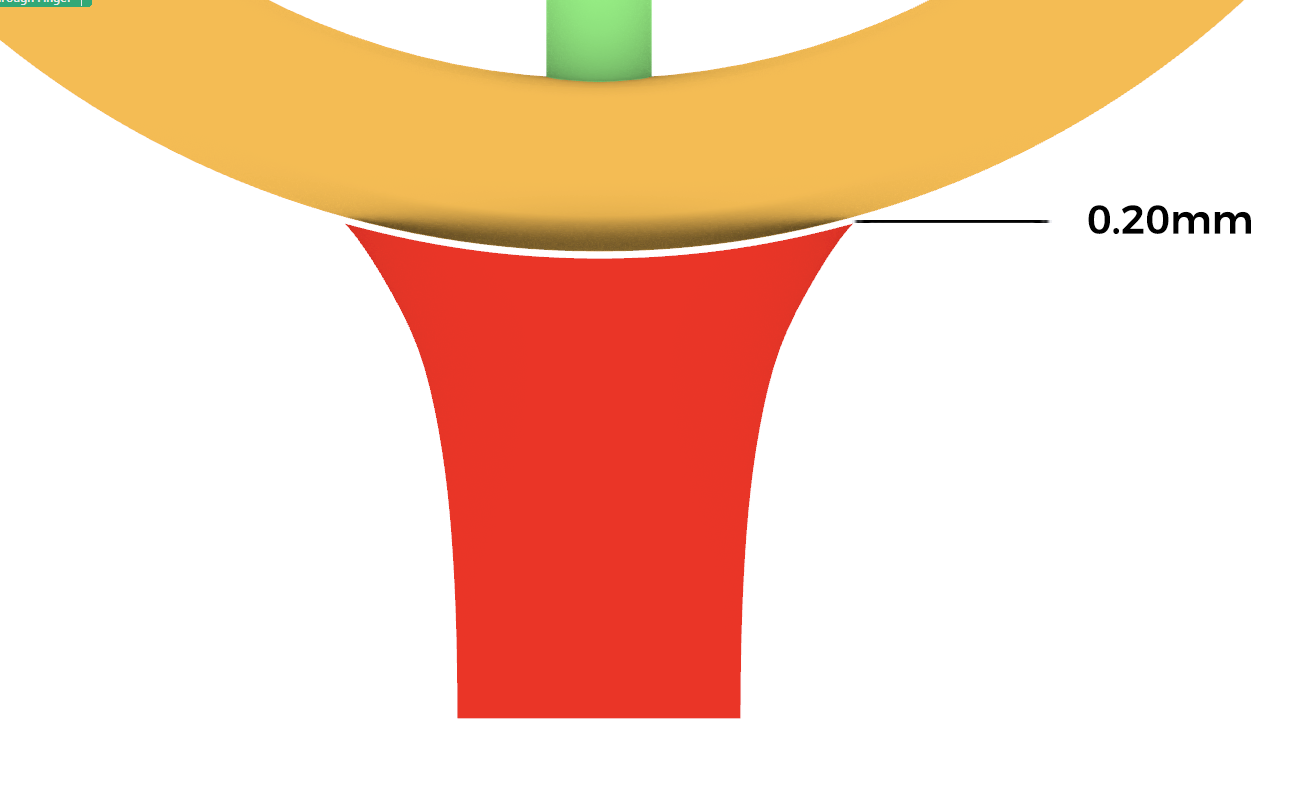
In order to avoid this issue and to have the perfect shank profile, your CAD designers must model in extra meat to fill up the empty space (so that it can print successfully) and your jewellers can have meat to work with when filing away the sprue.
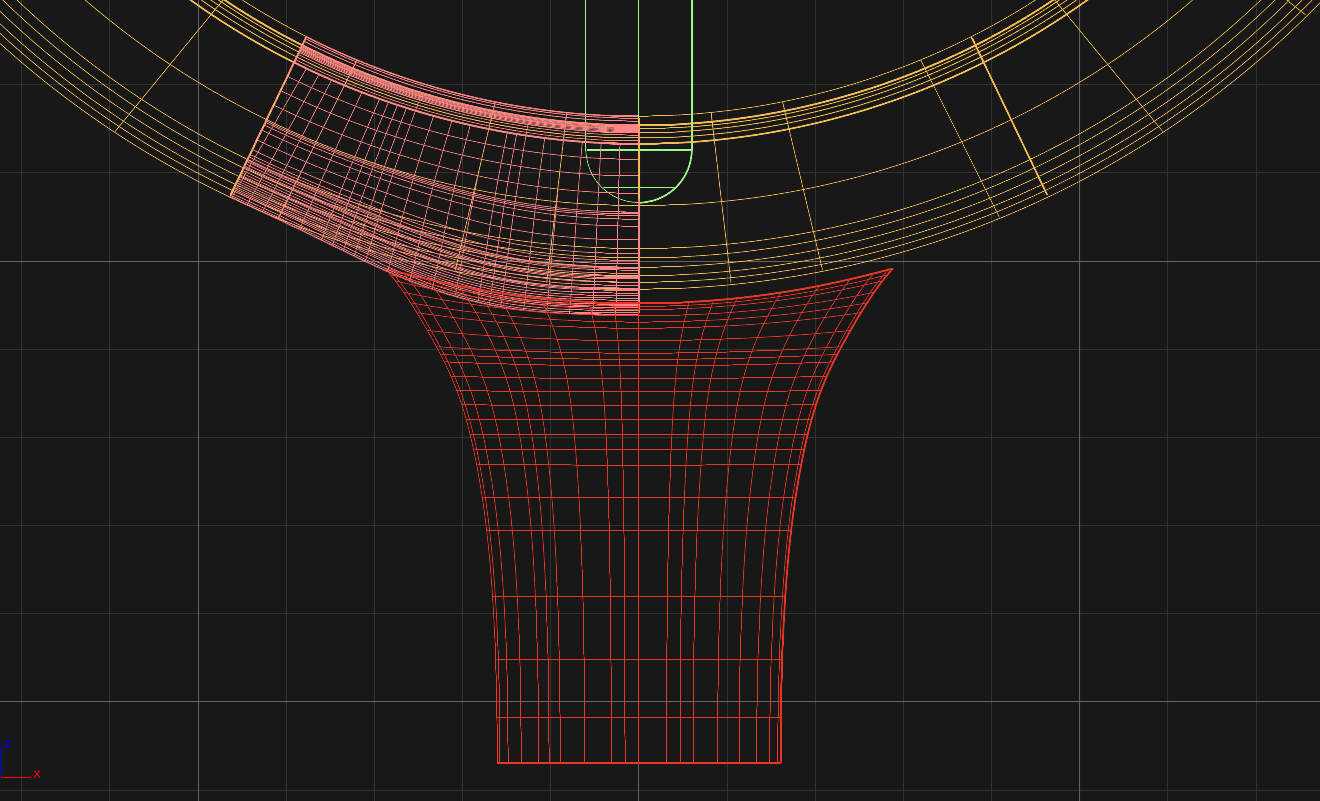
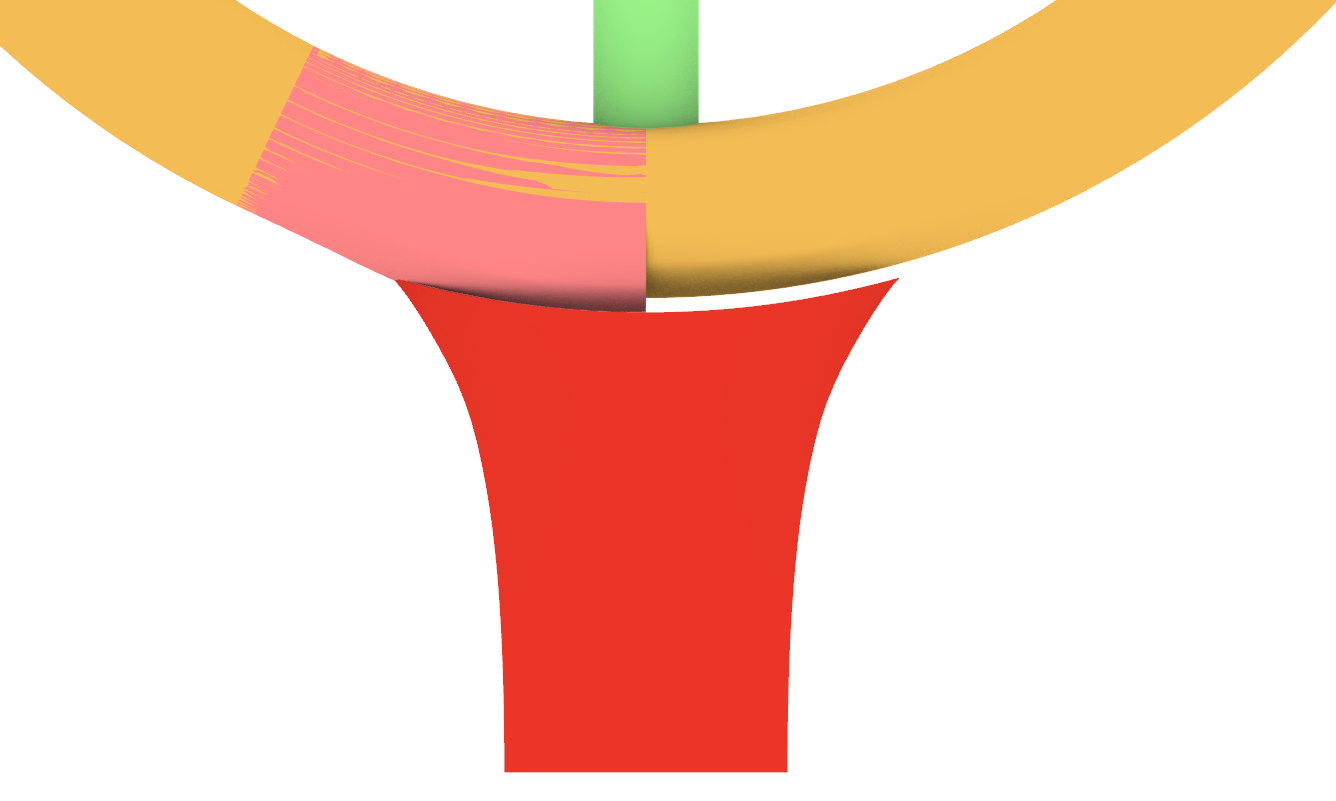
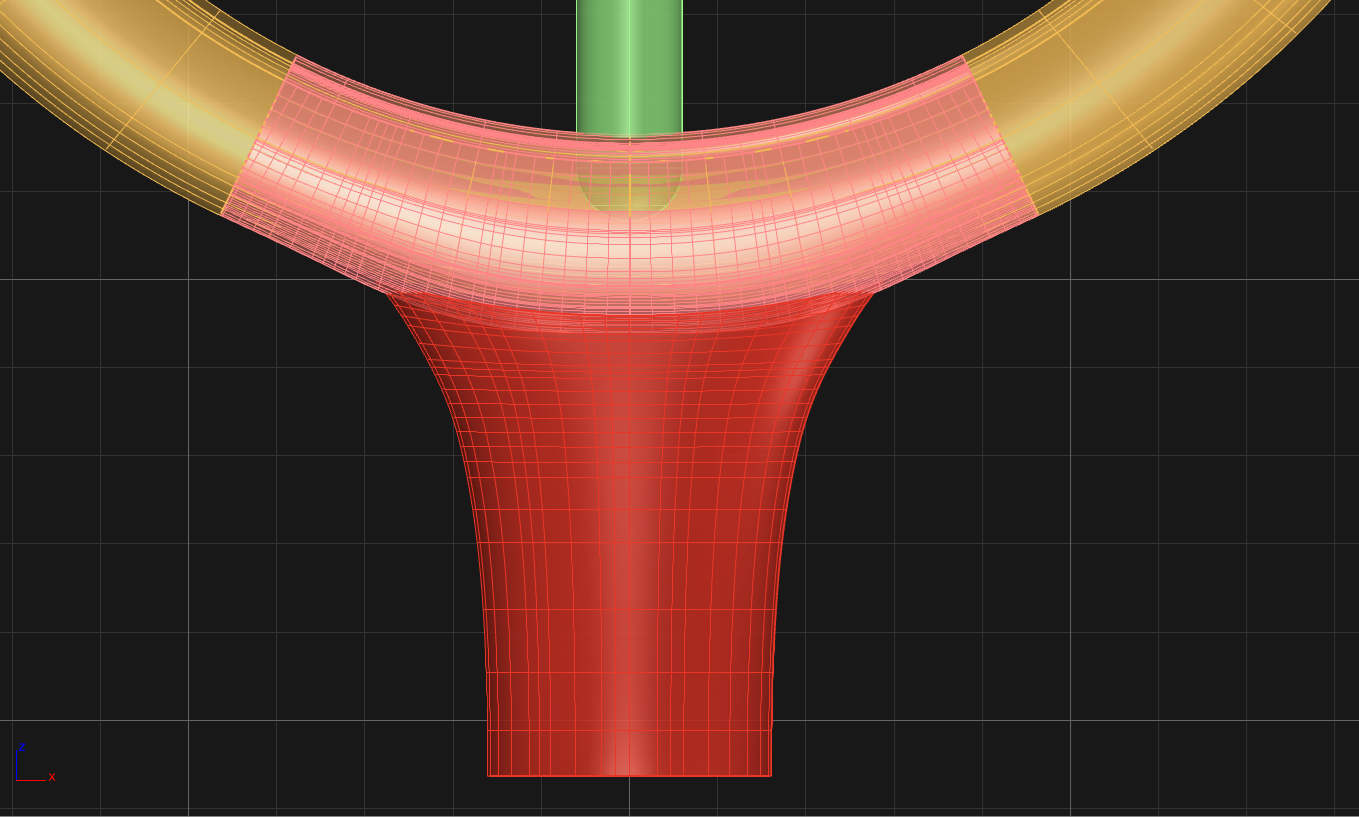
You can see the left image, we have displayed only half of the empty space filled up (highlighted in pink), the middle image is only shows an "over-emphasised" gap for web display purposes, and the third image is fully complete. This is how your CAD designers can fill in the empty space correctly to ensure perfect geometry.
Flow gates must also be included in the STL file you send us. They are critical for ensuring that molten metal reaches all areas before it begins to solidify. If you are casting a plain band without a centre stone or without a windowed setting work on the shoulder/side of the band, flow gates are not necessary.
Why flow gates are essential:
Minimum Flow Gate Diameters (green in images): 1.40mm
The reason we state 1.40mm is not only to ensure gold can flow fast enough to the setting work, but to also ensure the gates don't break off during the wax dissolving process. We found that 1.2mm gates provided a 50% breakage rate during wax dissolving, 1.3mm gates provided a 30% breakage rate and 1.4mm provided only a 5% breakage rate (meaning 95% of wax prints that contained a 1.4mm flow gate did not break during the wax dissolving process). Furthermore the larger the flow gates provide less shrinkage porosity and a significantly lower mis-cast rate.
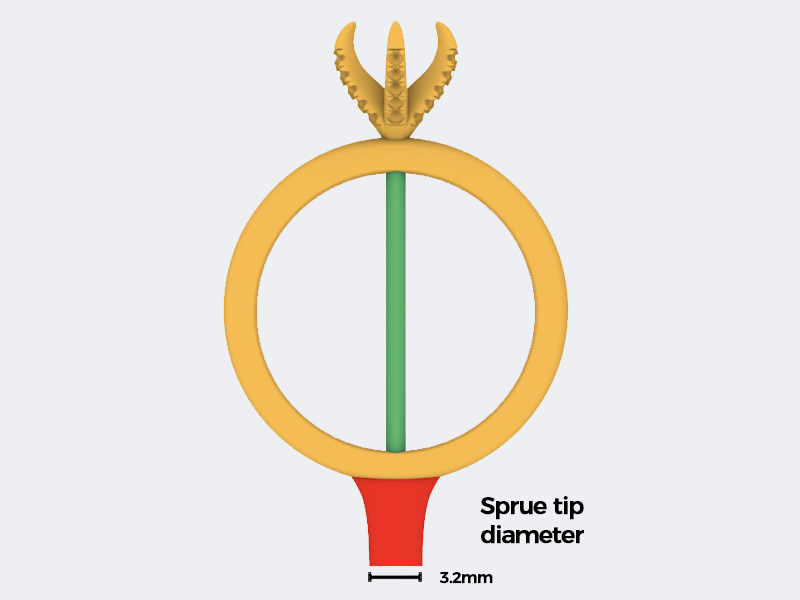
A ring with a simple setting on the top and no window shoulder diamonds, only requires 1 simple straight flow gate to the setting as per image.
As you can see, the ring represents yellow gold, and only requires a 1.40mm flow gate (green) and a sprue tip diameter of 3.2mm (red).
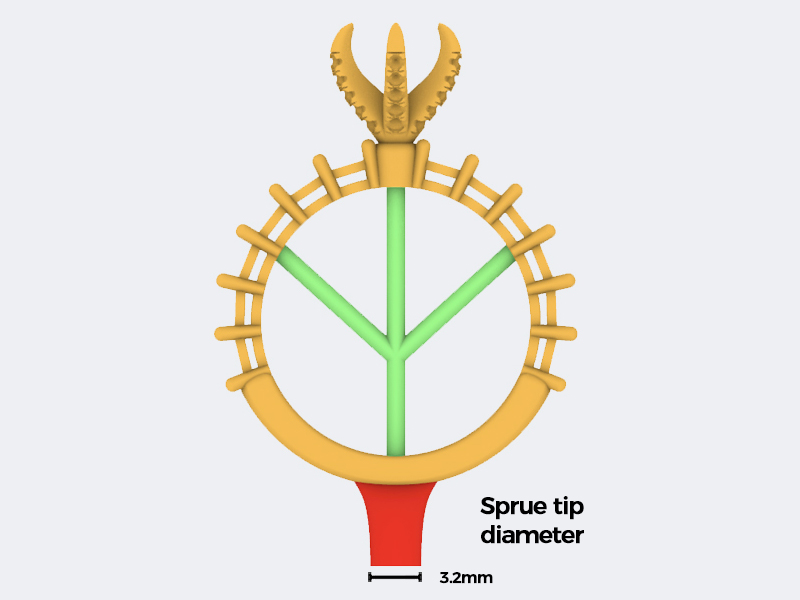
A ring with setting work on the side that also has holes/windows in the side of the setting requires a Y shape flow gate (green) in order to ensure metal can fill up fast enough between the setting work. Not having this Y shape increases the chances of miscasting and/or shrinkage porosity significantly, the flow gates shown are 1.40mm (green), whilst the sprue tip diameter is 3.2mm (red).
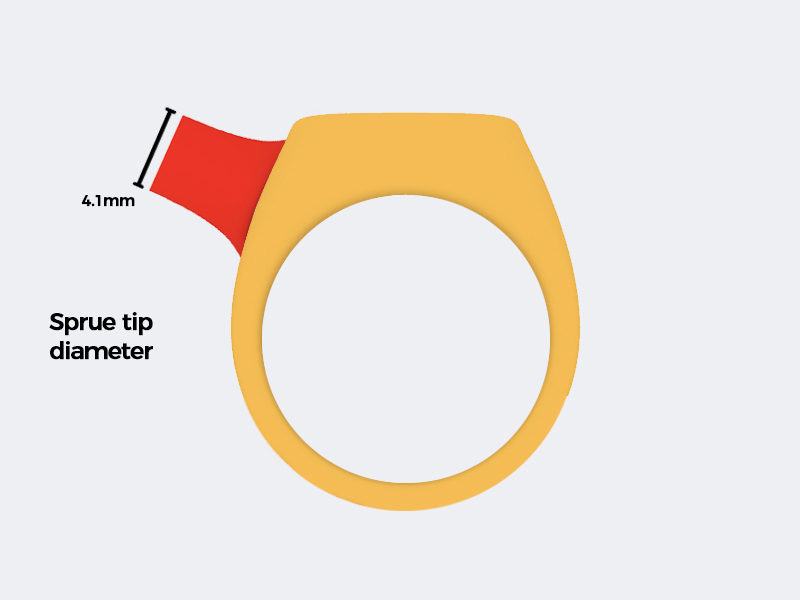
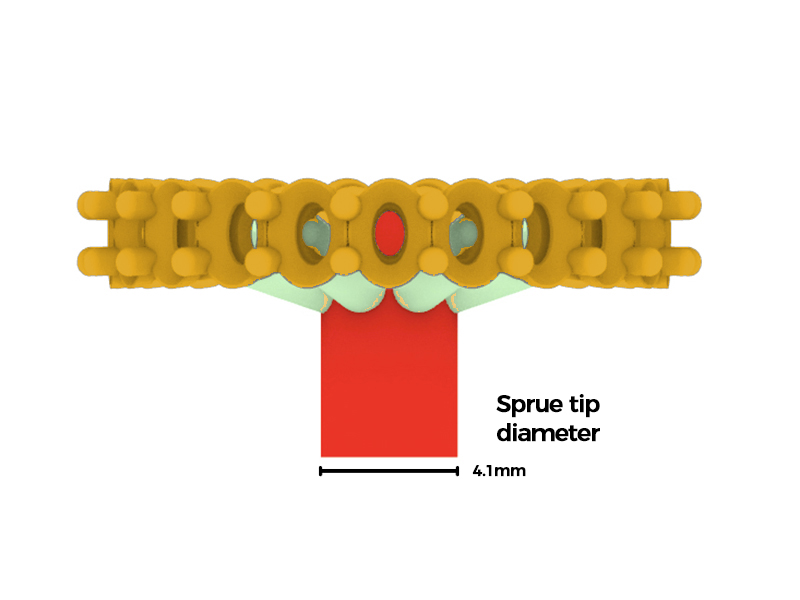
A thick and chunky ring require thicker sprues, this is simply a matter of your CAD designers working in proportion to your ring. The below example sprue has a tip diameter (red) of 4.10mm. The purpose of putting the main feeder sprue at the heavy section of the ring is to ensure metal to flow fast enough to the thinner sections (instead of thin trying to feed thick). By doing this method, we are able to eliminate shrinkage porosity, brittleness, miscasting and finger sizing issues due to shrinkage, in a ring of this nature (no setting work), flow gates are not required.
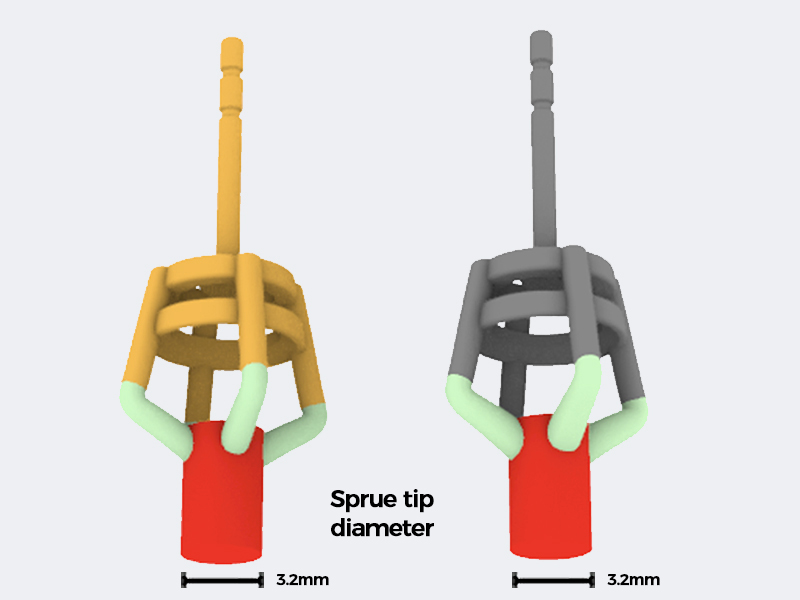
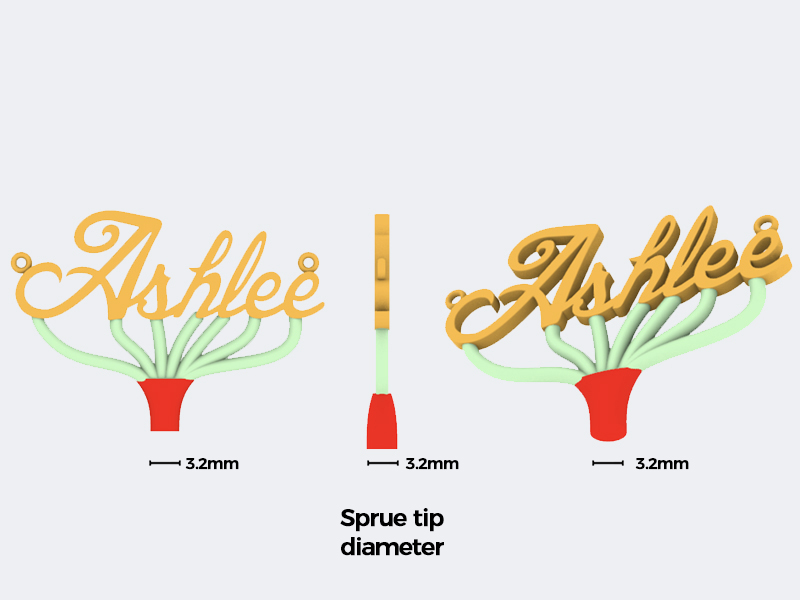
A stud earing, setting, pendant etc etc in this format simply requires the flow gates to meet every tip/claw to the exact size. The green flow gate can simply “pinch in” a tiny amount to the tip of the claw as a visual indicator for your jeweller to know where to cut. If your claws are 2mm diameter, ensure the flow gates (green) coming off the red sprue are 2mm in thickness and then “pinch in" to 1.80mm where they need to be cut, the red sprue tip diameter is 3.20mm
Long designs require multiple gates for consistent flow. Yes, the gates and sprue may weigh more than the item itself—but this ensures successful casting. We rather provide you solid information to receive excellent healthy castings as opposed to dealing with the potential of miscasting and shrinkage porosity by trying to “save” on the sprues/flow gates.
The green flow gates in this example are 1.40mm each and the red sprue tip diameter is 3.20mm.
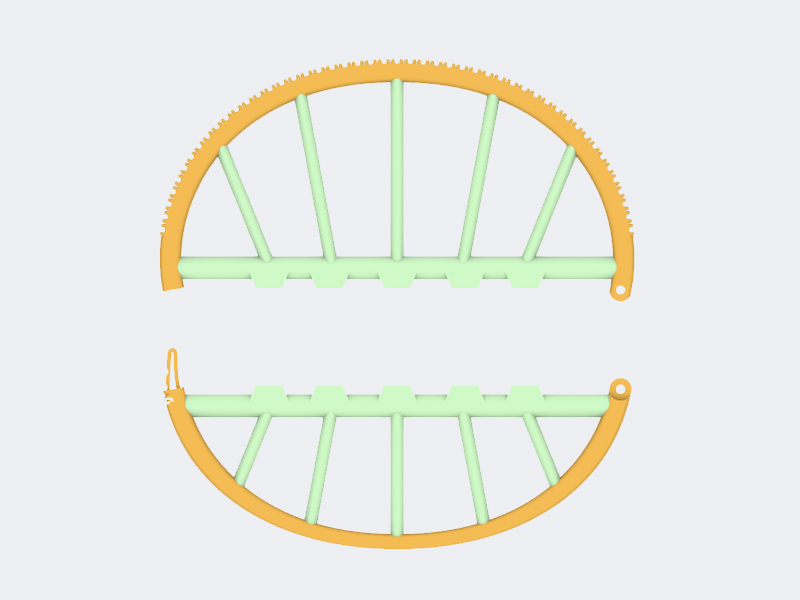
The below bangle is in 2 pieces, in this example, the flow gates are approximately 2.50mm in diameter and you can see a bar running across with tabs sticking out. Again this style of flow gates is crucial for a successful casting of bangles. Thicker bangles require thicker flow gates. The tabs running across the main bar are simply to give us a bit more meat as a contact point when we attach the thick main wax sprues to the flow gates.
The cost difference in printing thin (1.40mm) vs thicker (2.50mm) flow gates is insignificant, we don’t work by charging a premium markup for wax printing weight per gram but rather charge a competitive rate for the entire job that ensures you have a clean and successful casting.
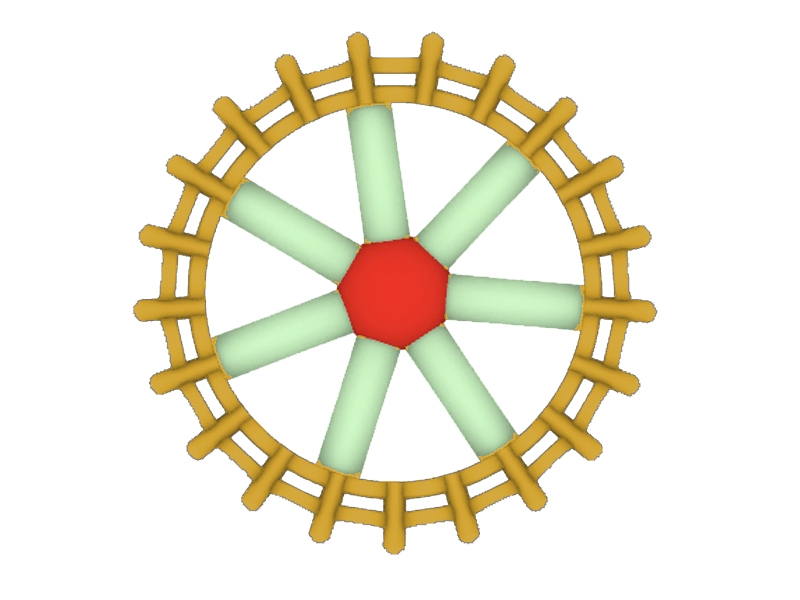
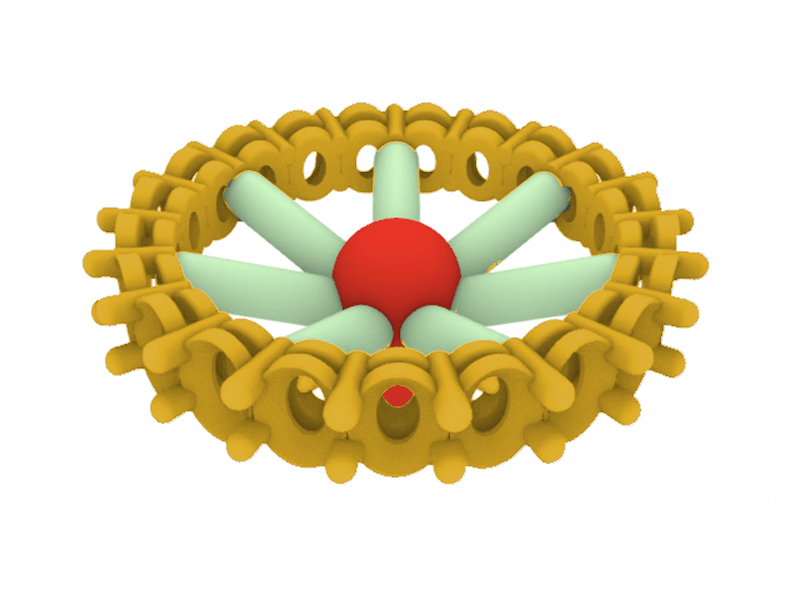
For rings with settings that go all the way around the band (leaving no external surface to attach a sprue), a specialised setup must be designed directly into the CAD file. This section explains how and why.
Centre Sprue (Red)
The centre sprue (red) must be: 4.10 mm in diameter
At the top of the sprue, you’ll notice a half-ball shape, this isn’t just decorative, it serves a critical function and purpose. The half-ball acts as a mini reservoir to counteract metal shrinkage during solidification.
As molten metal cools, it naturally contracts. If there isn’t enough feed metal nearby, the ring can “pull back,” leaving a sunken or porous area. The half-ball ensures there’s a buffer of extra metal ready to feed as the ring shrinks during cooling, thus resulting in a solid, clean and successful casting.
Flow Gates (green)
The green flow gates branching off the sprue:
Each flow gate is angled upwards, not flat, this is deliberate as upward angles help metal flow faster and more evenly around the band before it starts to cool and solidify, thus reducing the risk of incomplete fills, weak spots and porosity.
Also note where the gates are attached: they’re connected to solid surfaces, not open holes or windows. This small but important detail saves your bench jeweller and setter time. By anchoring to solid areas, there’s no need to drill through blocked settings or remove unwanted casting remnants in delicate spots.
These types of items are cast separately from standard pieces. We apply specific methods for casting to ensure clean and successful casting results for these items.
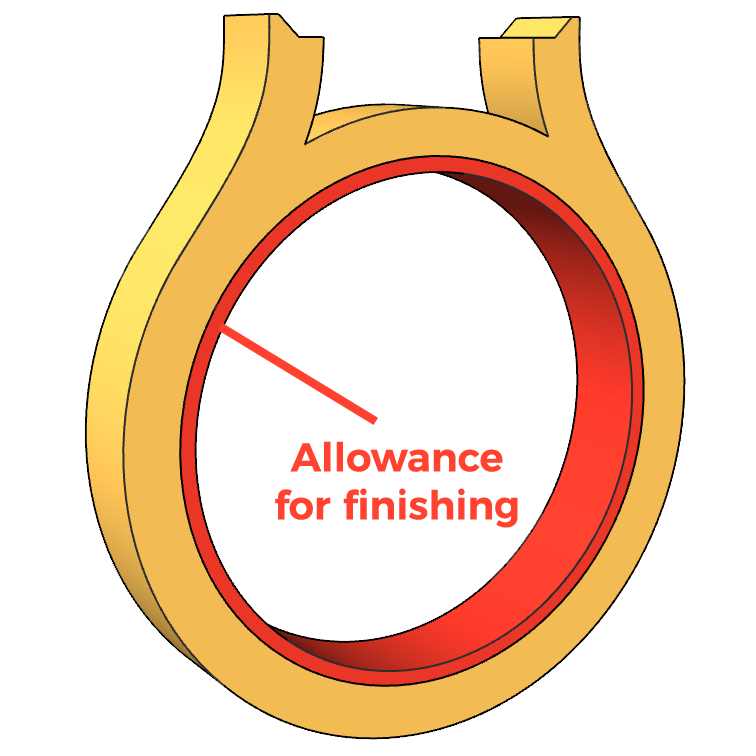
General Shrinkage with Finishing Allowance:
Our 3D wax printers operate with zero print shrinkage, and for most average-sized items, furthermore we can cast with no shrinkage with wax with most regular items as we have perfected our metal formulas, melting temperatures, flask temperatures and our quenching times.
However, castings require finishing to remove printing lines and on average, in order to remove printing lines and sand and polish to a flawless finish, you can expect to remove 0.10-0.20mm worth of surface material across the entirety of the casted item. If sizing down to the 0.10mm is absolutely critical, we highly encourage you to factor this into your CAD files by “upscaling” the design by 1% for gold and silver so as your bench jewellers sand, file and polish the items down, it can then be the sizing it must.
In the displayed image, you can see we have “over-emphasized” the red section, this is purely for display purposes, in the real world application, that “red” is only 0.10-0.20mm.
However keep in mind each jeweller is different, some jewellers are heavy handed on the tools and may require up-scaling to factor in their heavy handedness (ie you might need to add up to 2% shrinkage compensation to counter-act their heavy handedness).
Due to the nature of metal casting, where molten metal is poured into flasks that are not as hot, then rapidly quenched in water, some shrinkage can occur on larger thicker items like thick bulky signet rings or thick and bulky bangles. To compensate, we recommend increasing (up-scaling) your design dimensions by 1.00-2.00% for large, thick and bulky pieces.
If you're casting for a master for mould, a larger allowance of 2 - 4% may be required. Please note that we do not take responsibility for shrinkage issues related to master moulds, as there are many external variables beyond our control, such as whether you're using liquid silicone vs vulcanised rubber, or cold vs hot moulding methods. Best to consult with the manufacturer for guidance.
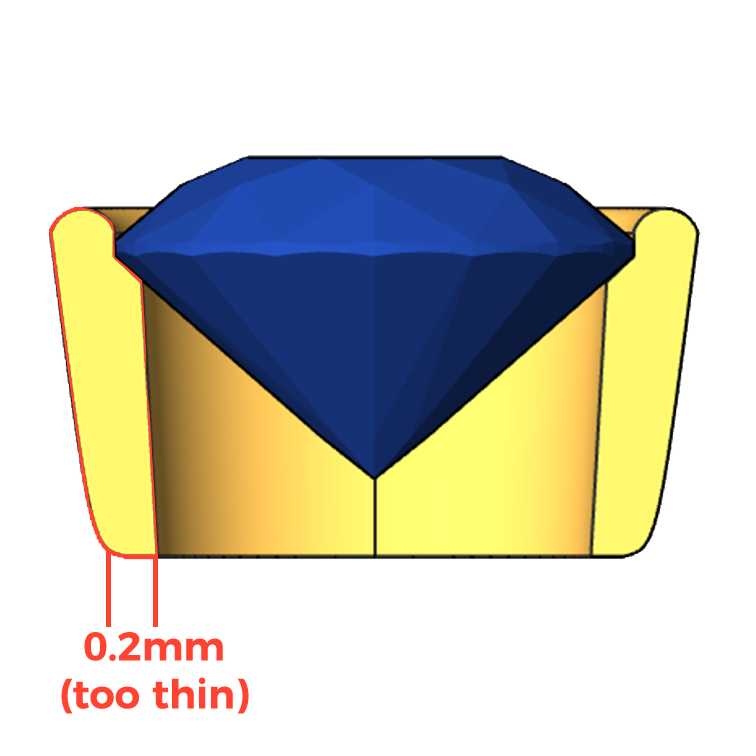
Wall thickness is critical for successful printing and casting. To avoid issues, all walls must be a minimum of 0.50mm thick - no exceptions!
Anything thinner than 0.50mm risks shrinkage, porosity, distortion, breakage, and even total miscasting. We do our best to spot potential problems during the process. If your CAD model is too thin and we can see through the printed wax (assuming it hasn’t melted during the dissolving phase), we’ll usually contact you before casting.
However, each print is chargeable regardless of outcome, so it’s your responsibility to ensure your CAD team isn’t cutting corners. The old saying applies: measure twice, cut once.
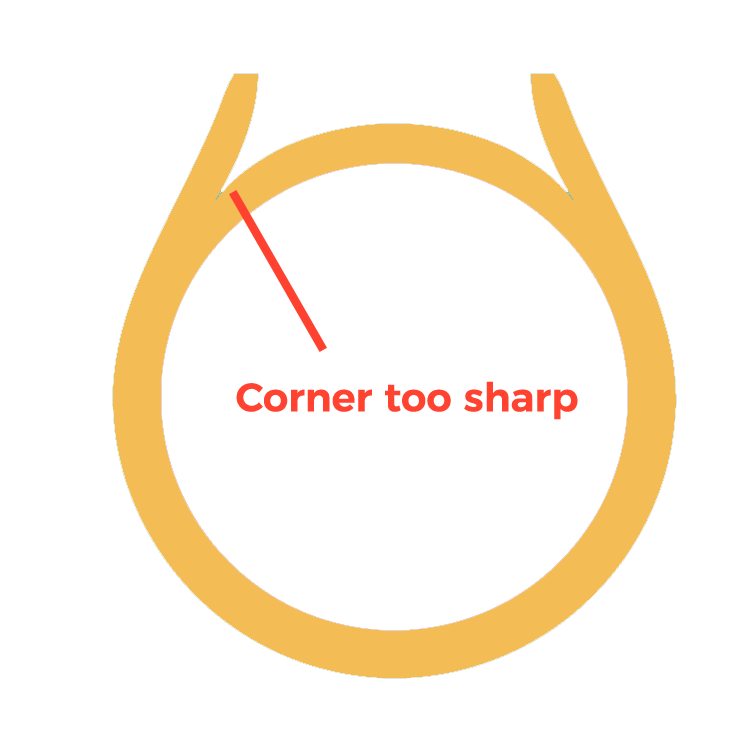
A common cause of investment wash is sharp geometry in the CAD model. Points, corners, and tight angles create stress in the mould and lead to casting defects.
All edges should be rounded with a minimum 0.125 mm radius, this is known as filleting, rounding, or edge softening. Most CAD software like Matrix Gold or Rhino has tools to do this quickly.
Common problem areas include:
- Sharp Lettering
- Split shanks with tight joins
- Settings with unbroken intersections
If it looks sharp enough to cut someone, it’s too sharp to cast!
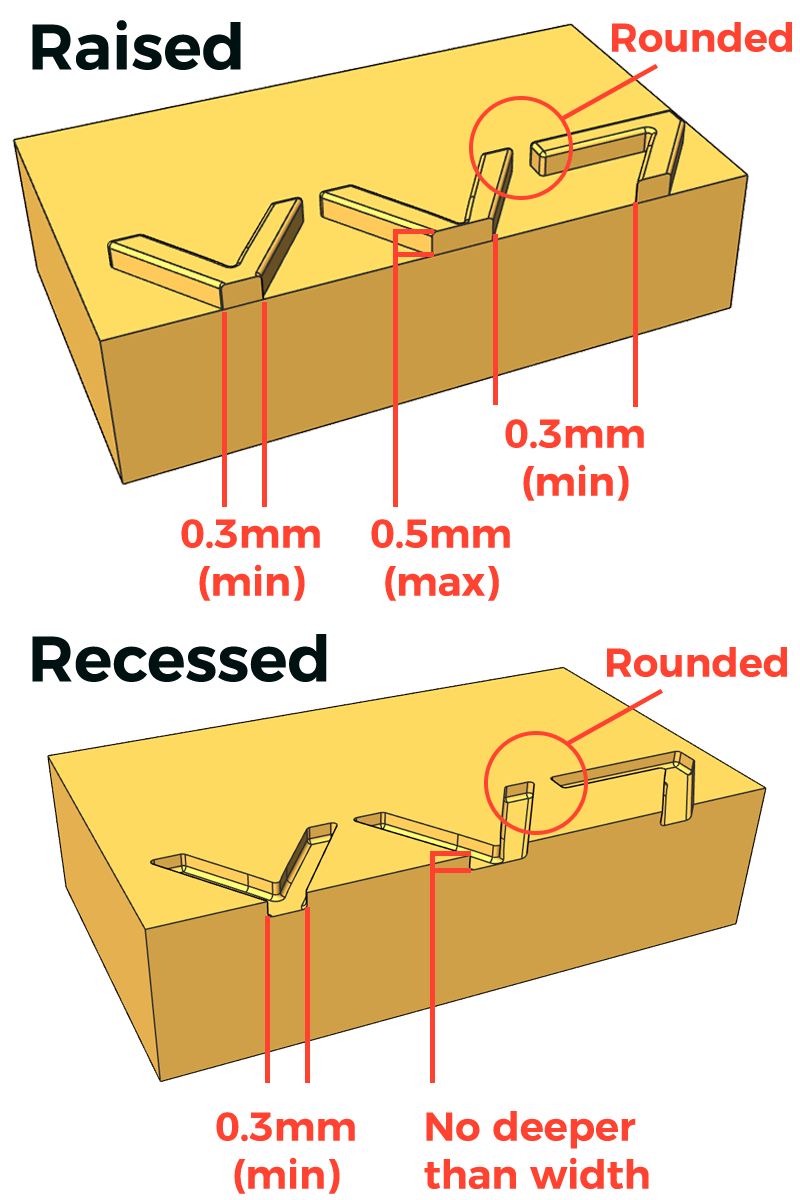
CAD designs sometimes include text, hallmarks, logos, or stamps, usually recessed into the piece. While these add value especially for maker’s mark, stylised fonts and intricate impressions can cause casting issues. For best results, use simple fonts like Sans Serif with square angles. Avoid designs that taper to fine points.
Raised text:
· Minimum letter width and spacing: 0.30 mm
· Maximum height: 0.50 mm
Recessed text:
· Minimum letter width and spacing: 0.30 mm
· Maximum depth: 0.30 mm or no deeper than the width of the impression
Whenever possible, add a 5–10° draft so the base is narrower than the opening, and round all edges and corners to at least 0.125 mm.
For complex or highly stylised text, laser engraving may be a better option.
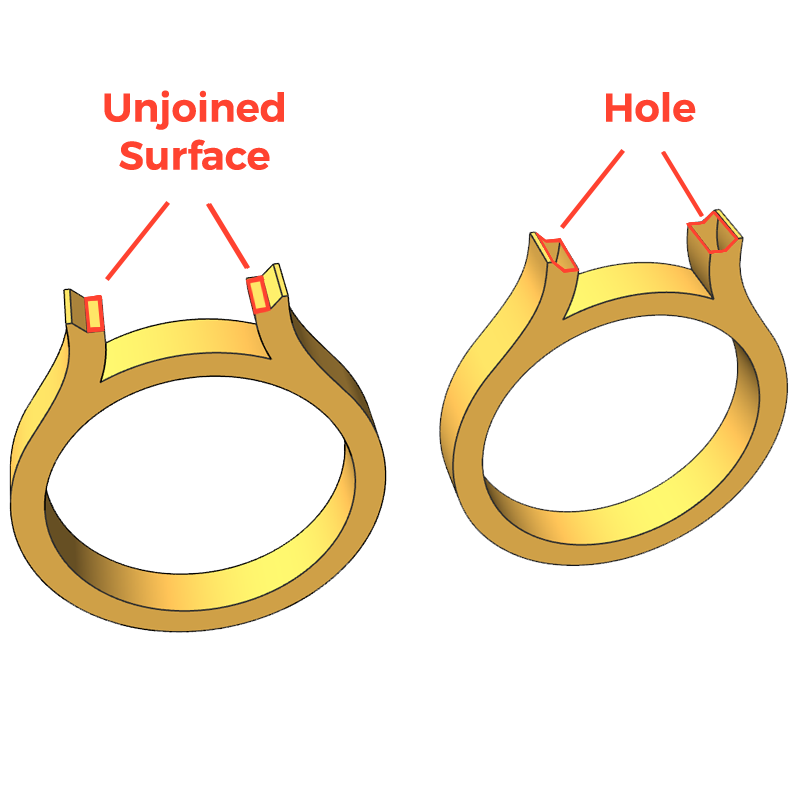
Naked edges are open edges in a CAD model that fail to connect to adjacent edges, resulting in a non-watertight mesh. Non-watertight models can cause errors during 3D printing or investment casting due to incomplete geometry.
These naked edges may not be visible visually and often only become apparent during mesh repair or cleanup.
Always run your CAD software’s analysis or diagnostics tools to verify the model is fully watertight and free of naked edges.
Curved surfaces, especially in 3D text and engraving features are frequent sources of naked edges, as most fonts are optimised for 2D graphic design rather than 3D modelling.
To keep things running smoothly and ensure top-quality results, STL files must meet the specifications outlined above. Files that don’t may be rejected, not to be difficult, but to protect your work and avoid delays or failures.
Whether you're casting two rings a week or two hundred, the fundamentals don’t change: clean castings start with clean files. Our workflow is designed for professionals jewellers, CAD designers, and retailers who take quality and precision seriously.
We don’t charge extra printing fees for thicker flow gates as the wax cost difference is typically under 10 cents. We ask for proper gating because it prevents breakages, shrinkage porosity, and miscasts all of which waste time and money.
Yes, thicker gates will require slightly more metal, however keep in mind we offer the most competitive printing and metal rates in the country.
We’ve seen it often: a jeweller tries to save a fraction of a gram on flow gates, only to end up with cracked waxes, failed prints, or poor castings. We don’t charge for miscasts, but they cost us, upset you by causing delays which is why we insist on technical accuracy from the very start.
Our clients range from independent jewellers to national retailers with hundreds of orders per week. What they all have in common: they follow spec, care about quality, and trust us to deliver clean, porosity-free castings every time.
Please ensure:
This is a technical process. Great castings always start with great files.
Whether you're a one-person workshop or a multi-store operation, if quality matters, we're the casting house that delivers.